Showing posts with label projects. Show all posts

Sunday, February 16, 2014

Ring with Sterling Silver Bezel Set Stone

 For Christmas my husband bought me a sterling silver soldering kit.  It came with a book and all the basic soldering supplies to get started.  This is something I have wanted to learn to do for a long time.  To say that I love jewelry would be a huge understatement...
I started reading through the book and working up a list of sterling I thought I might need to buy to get started. 
 Then I decided to go through my own jewelry and see if I could repurpose some things I had.   I wasn't sure how it would go and I didn't want to spend alot and end up needing to scrap it.  
The band was a plain sterling band I've had forever.  So I cut it down the front center, opened it up and then cut each side open to create the prongs.  The flat piece of sterling for the base was also a large ring I had bought that I cut loose and hammered flat.
The red "stone" is resin I think.  I loved the color but the ring itself was just a cheap metal.  I cut it out with my jewelry saw.  The bezel wire that goes around the stone I had to buy. It's fine sterling and it's very thin and soft.

 The sizing is something I'm trying to figure out.  Especially with larger rings, but this one fits me how I hoped it would.
 My husband spent the day with me helping me get everything set up -- It was our Valentine's date.
I have to say it wasn't as complicated as I thought it would be.  Flux, solder, pickle ---it sounds intimidating.  But it all made sense once I started actually doing it.
 It is so cool that you can take pieces of metal and create this...and it is strong once it has been soldered.  Watching it melt down and become one piece then filing it into shape....
Burnishing the bezel itself is also fascinating, watching the metal just crimp down and then smooth out and polish like this...
A whole new way to create, take ideas and watch them come to life...

Sunday, June 16, 2013

How to Reupholster a Chair FINISHED

 Here she is in all her finished glory....
To see all the steps of how I did it you can visit these other posts I did along the way....
 Her owner dropped off the trim to me last week and actually already came and picked her up....
 The trim covers up all the staples and raw edge of the fabric 
 I usually end up trimming off a little more fabric in a few places to make sure it all gets hidden.....
 I am happy with how she turned out and more importantly her owner is happy with her!
 I even have a few photos of her in her "real" home at the end of the post....
 I was waiting until we had our Father's Day celebration to finish up the photos to post...

 This is her final home....
With a cozy bee pillow she looks right at home....
Always a big sigh when it's all wrapped up and done....
and I already have my next slipcover project in my basement...

Monday, June 10, 2013

How to Reupholster a Chair part 5


This is the final piece of upholstering.  
I am making sure the squares on the seat line up with the squares on the front and back of the upper seat.  This is what I was talking about back when I was cutting out the fabric in Part 3....
And, depending on your fabric pattern, why you might need more fabric than you think....
Then I staple one or two times at the center front and center back...you should see a little bit of a crease in the fabric.  
Almost like you have pulled it too tight.  If it's smooth at this step the fabric will be too loose when you're done....
It's great to work with someone else for the pulling and stapling....
This is how I cut out around the arms.  You can try to use your old fabric as a pattern but I've found it's easier just to cut this out once I've got the fabric on the chair.
This usually involves me snipping a little then pulling it down where I want it to go and checking it then resnipping a little more and checking again...
Until I get it how I want it and it's all laying flat

This is the post at the back of the seat.  I usually stop cutting about 1-2" from the post.  This is just like clipping your curves while sewing.  If you sew you know that helps ease the fabric around corners and curves without it puckering up...
Since you have corners where there will be a pleat at the end anyways, start in the middle and staple out towards each corner.  Pulling/smoothing down towards the front and out towards the side at the same time.
Do the same on the sides.  After getting the arms/posts clipped I put one staple in the center of each side.  Then each arm is a stopping point, so work your way from that center staple out towards each arm...
Here she is all stapled and trimmed....
Here's the back all finished up and trimmed....
And here she is--  I'm just waiting on the trim to glue on over the staples/edge and she'll be ready to go back home in her new fabric.....

Thursday, June 6, 2013

How to Reupholster a Chair Part 4


The chair is actually finished and ready for trim but I was making freezer jam today from our strawberry picking last night so I'm still sorting through photos.  And trying to post them all in order.
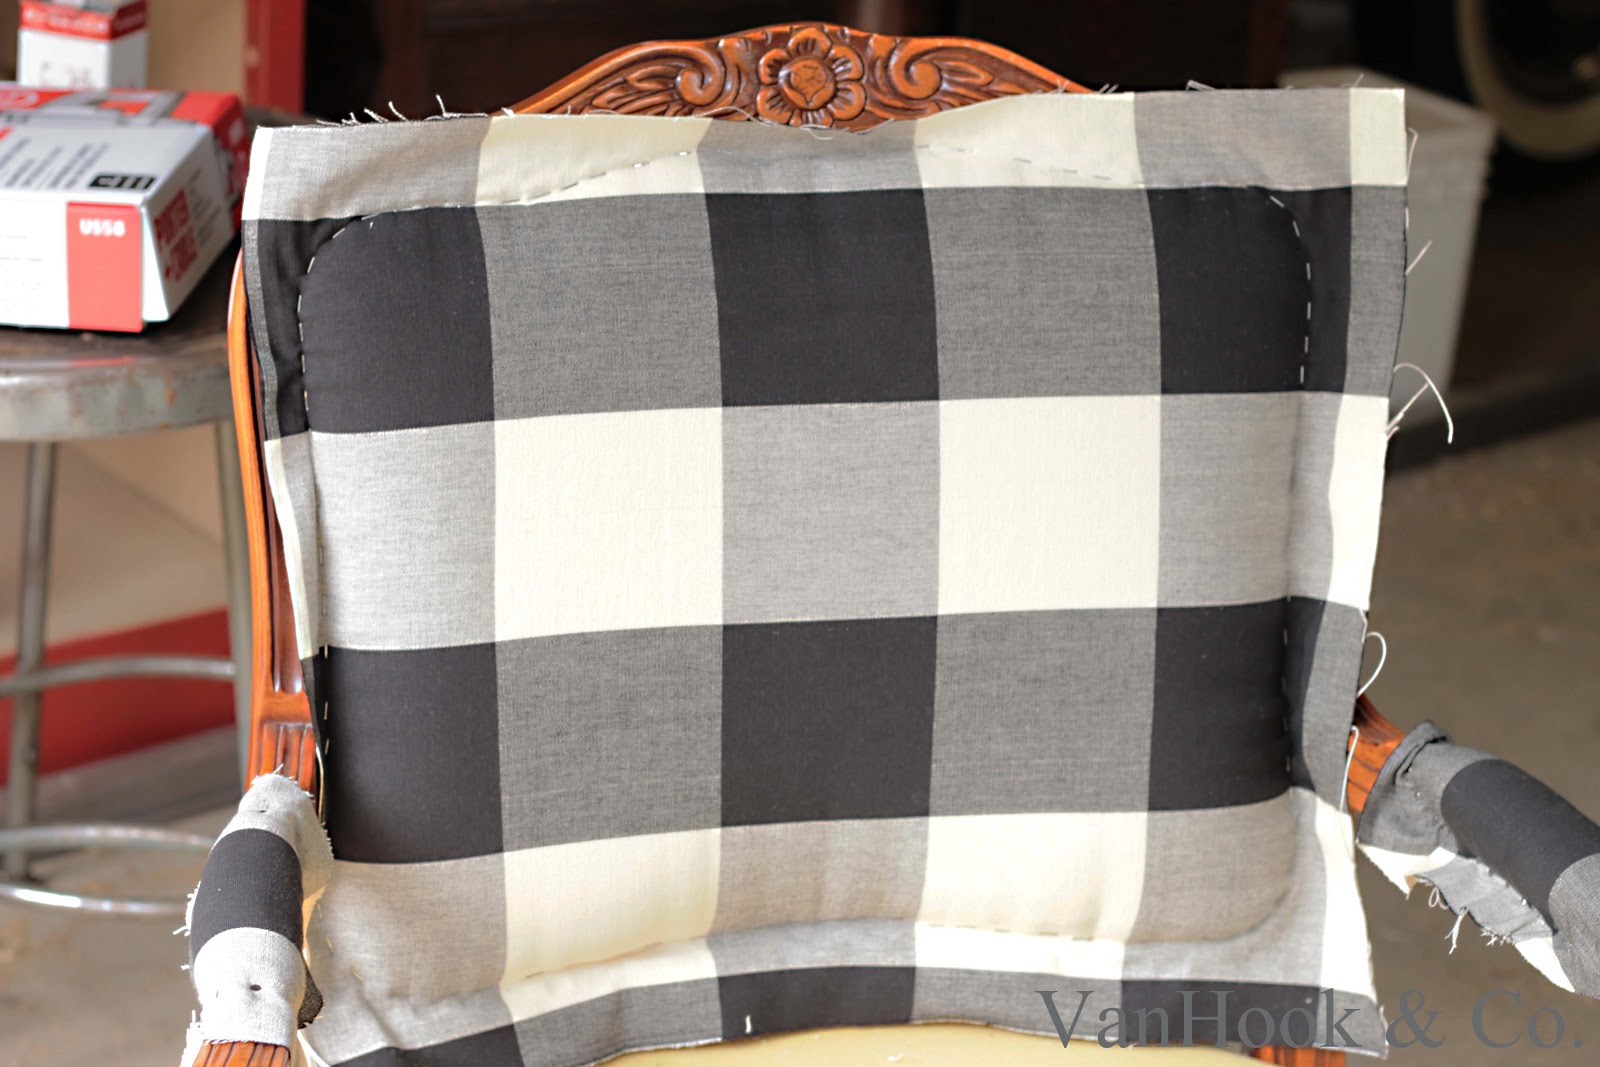
I usually start with the upper part of the chair so you can lean on the bottom without worrying about the new fabric on the seat.

 This is the back of the upper seat. 
Already stapled on.  I was occupied with using the new stapler and forgot to take other photos of starting it...
 There was a thin layer of foam which I put back after I stapled the fabric on...
 I folded the fabric around it and tacked it in a few places here and there to hold it in place...
 Next was the thicker foam for the upper seat and the next layer of fabric....
 I usually do a staple in the center top, then center bottom, then center of each side to hold it all in place.  You want to really pull the fabric tight.  Not so much that you distort the pattern but the foam is going to give a little when someone sits in it.  Keep smoothing and pulling all the way around..
 I usually just keep dividing the space between the staples in half and working my way around. 
I trim mine with a razor knife.  Do this part slowly and take your time.  If you trim it too close to the staples it can come loose and that means a whole new piece of fabric.  But you have to be able to cover the staples and the excess fabric with the trim.
The upper portion and arms are all finished up here....
And ready for the final trim to hide all the staples....
I can't wait to see her all finished up!

Monday, June 3, 2013

How to Reupholster a Chair part 3

And here she is naked as a jay bird and ready for some new fabric....
and here is where I tried my old hand stapler, and two other staplers from Lowe's 
all unsuccessfully 
when I finally decided to bite the bullet and buy the beauty below...
 Ordered it from Amazon Saturday night and first thing this morning it was on my porch.  
I LOVE getting tools
It's amazing how much difference having the right tool for the job can make....
This is pneumatic so if you don't have a humongus air compressor sitting in your garage (like my husband does) you'd have to purchase a small one of those too.
I was running it at about 55 psi today...
 It's really easy to use.
Nice,small and fairly lightweight without being "cheap" feeling.
But no safety so that scares me a little bit mostly because of the two curious monkeys that are always with me.... 
 The only down side is ordering staples and not being able to buy them off the shelf.  But you get a box of 10,000 so that should last awhile....
 Here's the new fabric laid out with the old pieces as a pattern.
It's very important to remember that you need to add at least a good 3" or so all the way around.  The old pieces you pulled off have been trimmed down after they were attached to the chair.  
You have to be able to pull on it and stretch it really tight as you staple it on.
I was also trying to make sure that I matched the center of a square (in the fabric pattern) with the center of chair itself.  And match the back with the seat.  
(see Part 5 for photos explaining this)
Then each of the arm rests needed to match each other too.
This is something to keep in mind when ordering or purchasing your fabric.  If your pattern is stripes for example, you might need more fabric in order to make all parts of the chair have stripes running the same way.  

Thursday, March 21, 2013

Painting with Stain

Things are a bit nutty around here right now...as usual.  I have 4 blog posts I'm waiting to post since it's gift items people haven't "given" yet--
I decided to make this small rack to use some hand forged coat hooks my husband made awhile back.  It will be in our booth.
I used this flower template I made up for a dresser I painted last year.
Traced 3 of them out with chalk (since I had 3 hooks to add)
Then painted the stain on with small paint brushes...
I added some blue acrylic "Martha Stewart" craft paint to the smaller petal shapes....
then wiped the chalk off with paper towel once it was dry...
finished it all up with some Tung Oil to seal it.
Added the hooks and she 's ready to go!
We're headed over tomorrow to start setting up and I'm getting excited.  I had some things out Tuesday to start labeling and pricing....
Hopefully I'll have some photos to share soon...

Monday, February 25, 2013

Chalkboard Notepads

 We are anxiously anticipating the opening of the mall that our booth space is in....
gathering up some things to sell and making some things to sell....
 This is a batch of chalkboard notepads....
 The small ones we sold at Winsome Cottage...
 These come with a small leather strap that holds the chalk pencil....
The larger ones in the back are a new size and shape, and I have another spinoff idea from these I'd like to try that's a different look...
Not enough time for all the things we 'd like to make!!!