Showing posts with label living room. Show all posts

Monday, July 29, 2013

Hand Built White Oak and Steel Frame Coffee Table

My husband built this coffee table over the last few weeks...
This ideas has been brewing in his head for awhile and it has finally become a reality....
 He fabricated this 1" steel frame...
 And used some angle iron to make these little clips which make a spot to screw the table top to....
This is some reclaimed white oak which turned out really beautiful....
This was a mock up to check the fit and see how it was going to need to attach to the frame....
 All finished up and polyurethaned to seal the top.
 She is in our booth for sale right now
This is also something that we could make in custom sizes.  Of course the wood is dependent on what you can find or purchase....
 I thought I was in the clear to take photos without someone trying to get in them since the kids were at grandma's house this day but I was wrong.....
Now the chickens try to get in on it too....
 Pretty happy with how she turned out....
So it's hard to let her go!  Maybe in the future we'll have one of these in our living room....

Friday, July 13, 2012

Sundial Cloth Covered Wire

 We purchased this sweet little clock at Springfield this past week-end.  So my husband, being the stickler for detail that he is, purchased some *VERY* cool cloth covered wire to add to it.
 If you're into the vintage look you have to check out their stuff!!!  Go to sundialwire.com --they have all sorts of color options and different gauges, etc.  This is a great resource for vintage electrical pieces.
 I was so excited to get going I didn't do photos of wiring up the plug.  It's pretty simple.  You strip the wires (I have those photos below) the same way you do to wire to the clock itself.  Only there are two little screws inside the case of the plug that you wrap your cord wires to.  Then you tighten those screws and put on a little plastic cover.
 Unwiring the old plug...the little metal wires are just twisted together...untwist those.
 Pull the cloth back and there is a plastic covering on these wires as well.  You'll need wire strippers to remove that and expose the wires.  You'll need about and inch or so to work with...
 Our wire was 18 gauge --your wire strippers are marked for different gauge wires.  You're cutting up to the wire without cutting the wire itself off...
 Put the cloth wire up through the opening in the clock...you can see the copper wire exposed at the tops of the cloth cord....
 Twist your wire together --splitting the cord wires so you have two separate pieces and then twist one to each of the cords coming from the clock itself....
 Twist on some wire nuts.  They cover the exposed wire and you tighten them until they won't tighten anymore....
 Ohhhh she looks good like this!!!!  Love it!  We actually wanted the red cloth wire but it was backordered in the size we needed....

 He sooooo deserves this...for those of you who know my husband he's pretty quiet and reserved in public....at home it's a different story....I'll leave it at that....
 And there she is....I've been rearranging living room furniture AGAIN.  Because I cannot be still apparently....The cool little lamp was a Goodwill purchase.  I just loved the tall shade for some reason.  And I stole the fern idea from Melissa at Cass House...love her blog...check out the beautiful home they live in, and have been working on fixing up if you get a chance!
 And I re-did the little table.  My uncle made it for me and I'm planning a post on that.  I used some blue wax....a pretty nifty little technique--tinting your wax with paint!
The bathroom is so close to being finished.  My husband is finishing up the big sink install as I type this....photos of that soon too!

Sunday, May 20, 2012

Sign and Flea Market

This past week-end was the big Springfield Extravaganza at the Clark County fairgrounds here in Ohio....it's huge...over 2000 vendors this year I think....
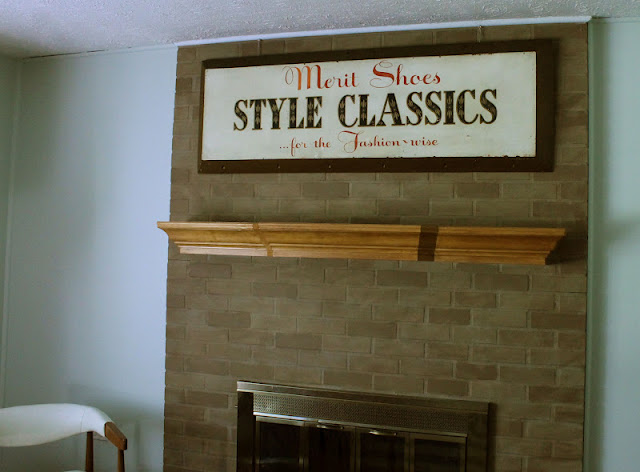
 And this sign is my Mother's Day gift!!!  How cool is it?!?!??!  Someday it will be Mighty's ---
the child has whole obsession with shoes and she's not even 2 yet....
It was even one of the first words she said really clearly...
 We are in love with old signage like most other people out there who decorate with vintage bits and pieces
----it's usually way out of our price range.
 We mostly just Oooo and Ahhhh over the really cool ones, but this one caught my eye because it was not the typical "old sign" you usually see..... and it's for shoes...so how can you go wrong?????
 The price tag said $50 which was making me really think about it and the gentlemen that were running the booth said "what are you looking at or thinking about there?" 
When we said it was the sign, one of them said "Let me help you decide--I'll take $30 for it"
SOLD!
 I also bought these numbers and letters...
That's the year we got married 
and the first letters of my kids' names which I have another idea for....
 They were 2 for $1 and pretty sticky but I used some WD-40 and they cleaned right up....
I'm in love with my sign though...
I could've painted one to look old, but you just can't replicate REAL patina....
Love the style of her, the colors, the lettering...
she's a keeper!

Sunday, May 13, 2012

Wagon Wheel Starburst

 Since I bought my $5 dining set way back last summer I've had this new obsession with Midcentury Modern furniture and decor.
 I'm all over the place when it comes to decorating.  We have all sorts of "eras" represented in our home.  But I've been on the look out for a starburst clock to hang over the TV.....
They are expensive.  
 I've also looked around at all the DIY projects with shims and paint sticks where people glue them to the back of a round mirror creating the same type look....
But I think what makes for good DIY doesn't LOOK like DIY and I wasn't really sold on anything I saw
Recently we ventured out to one of our favorite outdoor flea markets that we've been waiting all winter to get back to....
Only we took Doodlebug with us-- 
 it turned into a total disaster and we left early
so we stopped at another little indoor flea market on the way home and I spied this...
Perfect.  
Love everything about it---
the patina
the size
the broken spokes 
The same look as a starburst clock but different.
I LOVE different!!!
I would really like to hang it on the wall over the TV but with having the house for sale I've decided to leave it on the bookcase for now....
It would make a really cool light fixture too...

Wednesday, April 4, 2012

Distressing Chalk Paint with Water

In my last post showing the new living room I showed off these bookcases and mentioned they needed their own post.
 These two beauties came from a dumpster so they were a little banged up and had some broken glass in them...I don't have a good "before" photo but you get the idea...the doors are below...
 I decided to use "French Linen" because the "Paris Grey" was a  little more blue than I wanted in the living room...
 So I painted it on the high, detailed spots with the French linen because I wanted it to show through the Old White.  
 This is nice because you don't have to worry about making nice straight edges...much quicker! And it's all getting covered with the Old White.
 I debated buying the "Aubusson" color for the interior.  It would've been really striking in there but I'm glad I went with a warm color 
The "Arles" looks really nice inside...
 SOoooo in reading the book I saw that you could use water to remove the paint if it hasn't been waxed---REALLY????  
I decided to give it a try on these...
 The chalk paint is wonderful to work with don't get me wrong--but the paint, wax, distress, rewax, dark wax---it's alot of steps especially on bigger pieces with alot of parts!
 So I used a damp, clean cloth diaper and a bowl of water.  You'll be pulling the paint off so every so often you need to rinse the cloth out and get clean water....
 It took a little bit of consistent work in one spot before it started to come off but if you are really wanting the base color to show through this process does that well...
And NO dust at all --
much different from sanding...
But I should add that I did sand a little bit here and there....
 This is also where the texture of the paint really adds to the distressing....the more texture your coats of paint have the more those show when you distress.
I finished them up with clear wax only.  And I found that brushing the wax on and really working into the paint then giving it one, gentle swipe with a clean cloth helps remove excess wax. 
 The idea is for the paint to be hardened and not feel tacky or waxy when it's done.  
  Then I waited a day or so and went back over them with a clean cloth to buff them a little and get a soft sheen...


Chic on a Shoestring Decorating
Furniture Feature Fridays