So to make our hat you need to know how to knit and purl and the difference between the two. So to start with here's our hat again...
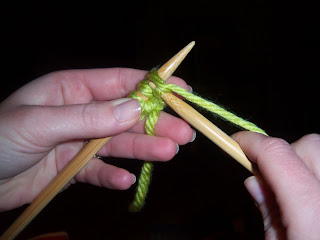
The stripe is really easy too. When you get to the end of the 3rd or 4th row, leave a 4" tail and snip off the knitting yarn. Take your new color yarn and tie it onto the tail of your previous knitting yarn. I try to get my knot right at the edge. In the end you'll be "hiding" all your knots. So in Knitting 101 I showed you how to cast on. You should have 56 stitches on your size 6mm knitting needle. The needle with your stitches on it now goes in your left hand. The empty needle is in your right. Let's start with knitting...
The empty right hand needle goes into the first stitch at the bottom and toward the back. This is how I hold my yarn in my right hand as I knit. Do whatever feels comfortable. You want it taut but not so tight it won't slide through your fingers. The yarn on top of the right pointer finger is going to go up and get wrapped around the empty right hand needle...
Sorry about the blurriness---I love my photographer but he lost patience with our not-so-great camera!!! I like to pull that yarn down in between the needles before I try to pull it through the stitch on the left needle.
You then use that right hand needle to pull the yarn down and through the stitch from the left needle. This is why you need to make your cast on stitches not so tight! It's much more difficult if you're a tight knitter.
Once the right hand needle is all the way pulled through and free of the stitch your going to pull the left needle out of the original stitch that was on it. (There is a better picture of this step in the purling instructions)...below is when you've successfully transfered the new knitted stitch to the right hand needle. For our pattern you would repeat all of that for the next stitch as well. So then you should have two knit stitches on your right hand needle.
On to purling! The difference is how you insert your needle and where the yarn is...
First you take that yarn that's resting on your right hand pointer finger and bring it in between your needles to the front of your knitting.
wrap the yarn from your pointer finger around the right hand needle...
Use the right hand needle to pull that yarn back and to the right
until you are free of the left stitch...
The picture above is a good picture of pulling the left hand needle out of the stitch --you can tell just by looking at the left needle it's ready to come out of the original stitch....and the picture below is making the final transfer of the new stitch onto the right hand needle. You repeat these purl steps again so now you should have 2 knit stitches and 2 purl stitches on your right hand needle.
When you get ready to switch back to knitting you'll have to take the yarn (in your right hand) that your knitting with and bring it back between the two needles so it's in the back-- BEFORE you knit your stiches. Remember how you brought it forward to purl??? Same thing only you're taking it back.
Below is a small sample of what knit 2 purl 2 should look like. The two stitches on the far right are knit 2 the next two stitches are purl 2...
If you look closely at how they sit on the needle--the knit stitches look like little men straddling the needle. You get the columns of little "V"s going up and down. The purl stitches look like they have little "nooses" around their necks....or little horizontal bumps. The first row is really difficult to see. Once you get several rows it will be alot easier to tell which is which.For our hat pattern you want to knit 2 purl 2 for 26 rows. And you are going to knit the knit stitches ALWAYS and purl the purl stitches ALWAYS!!!! So when you finish a row use your little row counter or make some slash marks on a piece of paper. Swap your right hand needle to the left hand and the empty needle back to your right. Then knit the knits and purl the purls!!!!
Tomorrow I'll show you how to decrease at the top of the hat...it's not nearly as hard as it sounds....Happy knitting!!!!


No comments:
Post a Comment