Showing posts with label industrial. Show all posts

Monday, May 6, 2013

Zinc Covered Letters

We have scrap pieces of zinc left from covering tables that are pretty much too small to do anything else with....
so here's what we decided to do...
 We laid out block letters (an H and an L) on 3/4" plywood and then cut them out with the jigsaw...
 Here's the H all cut out....it's 18" tall by 12&1/2" wide...
To cover the H we added the 3/4" and another 1/2" to be able to wrap it around the sides and all the way onto the back so there is a place to tack it into the wood....
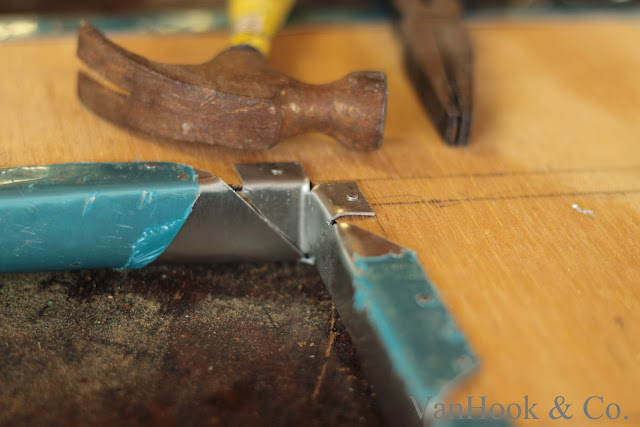
Here's how I decided to tackle the inside corners. 
The photo of the "L" below shows the metal clipped for the inner and outer corners which might help it make sense...
The outside ones are easy because you cut a square out and solder them...inside corners you end up with a "v" shaped gap...
So I added these small pieces and soldered the seams....

 And since these are decorative letters I decided to leave the corners a little more rough and not worry so much about smoothing them out all the way...

 It's in our booth (#15 aisle #2) now at the Peddler's Mall....

Wednesday, April 3, 2013

Reynold's Factory Cart


 The second factory cart we have to sell...
24" x 64" and 14 1/2" tall she's a bit narrower than the others I've seen and that would be really nice for a coffee table...
Metal corners that wrap around...
 Lettering on each side....
Somewhat sanded but still plenty of patina and color on the top...
She's available and in our booth at the Peddler's Mall.

Saturday, March 30, 2013

Crouse Hinds Lights with Spun Aluminum Bases

Some Crouse Hinds explosion proof lights...
Adapted to make standing lamps which now sit on our mantle...
We bought some edison style light bulbs to put in them...
These are a little short...but they are ridiculously expensive so maybe next time we'll go with the taller ones...
They look really cool lit up at night....
My husband made these spun aluminum bases for them...
First you make a wood mold (he used hard maple) in the shape you want.  The aluminum starts out as a flat sheet (.050 or 50 thousandths).  Both are attached to the lathe and a steel rod is used to press the aluminum down and around the mold to create the same shape in the metal.
Here's a link to a youtube video if you're interested in seeing it done. 
FYI the video is not my husband...
These turned out really well...the bases are well suited to the style of the light.
Some red cloth cord from Sundial Wire with in line switches from Vintage Wire & Supply...
He added a small, black rubber grommet to protect the cord going into the base...
Some vintage style plugs also from Sundial...
Industrial lighting at it's finest...
I'm sure these will travel all around our house the longer we have them....